Website Migration from cPanel explained
Your customers can now take advantage of our free website migration services by opening a ticket from their Hepsia Control Panel with a website migration request and the details we’ll need to transfer the site over to our platform successfully.
Your customers have two choices – to either provide our technicians with their Control Panel login details, so they can perform the task for them, or to start the transfer process on their own – if they does not feel comfortable sharing their personal details.
To start the transfer process, your customer will need to log into the cPanel Control Panel and to stick to the following steps:
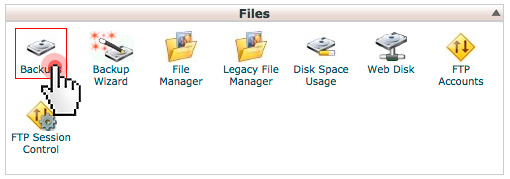
1. Click on the Backups option on the cPanel dashboard:

2. In the Backups section, click on ‘Download or Generate a full website backup’:

3. Then, select ‘Remote FTP Server’ from the Backup Destination drop-down menu:

4. Next, enter the email address of our support department (support@propersupport.com) in the Remote Server field:

5. After that, the customer should enter the FTP details for the destination server, which are provided in the welcome email at signup.
The FTP details include:
– FTP server, which is the default server host that we assign to your customer at signup :

This is where the FTP server host is located in the Welcome email that we send to your customers on your behalf:

– FTP username, which is the customer’s account username on the new server, also found in the Welcome mail:

– FTP password, which is the customer’s FTP password, featured right under the FTP username in the Welcome mail:


7. Finally, the customer will need to enter ‘/’ (slash) as the remote directory in the Remote dir field:

8. When done, the customer needs to click on the ‘Generate Backup’ button and to wait for the backup to upload to the newly created hosting account:

When the backup is complete, our support staff will be notified immediately by email and will start the migration straight away without any delay. All this will be done on behalf of your company for free.
We have also prepared a special user-oriented Control Panel tutorial, which our technicians will give to your customers to help them with the cPanel site transition.
Nevertheless, you can use the information here to make your own custom tutorial or step-by-step guide to address your customers’ website migration needs in a more targeted way.


Leave a Reply