Memcached – speed up your dynamic database-driven sites now

This is the second-in-a-row article about web accelerators – the magic Control Panel-integrated tools that can give a significant boost to your sites and applications. The first article was about Varnish – the web accelerator for content loaded sites with irregularly updated pages.
Today, websites are faced with the challenge of delivering loads of dynamic content to visitors and with the decreasing attention span of those who are impatient to wait when the content is served too slow.
Normally, servers would load pages every time they are requested, which could have a slow-down effect on the speed at which a frequently accessed page is served to the visitor.
Also, the repeated queries to the database server can lead to a non-cost-effective resource usage. Luckily, there are tools like Memcached that can help you streamline the data reading process and hence reduce the load on the server and the waste of valuable resources.
What is Memcached?
Basically, Memcached works as a caching layer between the requests of the visitors and the server itself.
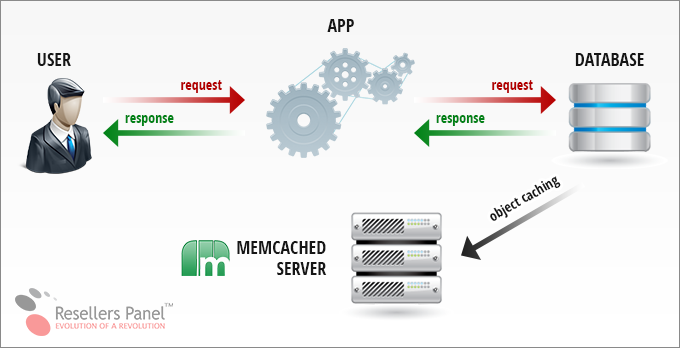
Technically speaking, Memcached caches data and objects in the server’s RAM so that the frequently requested data can be served directly from the memory instead of the database server/API.
Here is an illustration of the way Memcached works during the first and each following request:
First user request:
When a user opens a page for the first time, the request is sent straight to the database server and, in the meantime, the data is stored in the Memcached server:

Second user request:
The next time the user makes a request for the same page, the data will be retrieved directly from the Memcached memory instead of the database server:

This will significantly reduce the number of times a database is read and in the meantime will make pages load much faster.
If you have a traffic-intensive, database-driven website like a large e-store, a busy blog, a news portal, etc., which serves hundreds of visitors per day, then using Memcached is indispensable.
Memcached works as a caching layer for some of the most traffic-heavy sites such as YouTube, Reddit, Facebook, and Twitter. Some popular CMSs like Joomla and WordPress support it too.
How to work with Memcached?
Working with Memcached requires a proper installation and a good control of its settings. This is why, we offer Memcached with all our web hosting plans, so our system will take care of the installation and the memory allocation procedures for you.
Here is an example of how to create a basic Memcached instance on our servers:
In the Web Hosting Control Panel, select Memcached from the Advanced section and click on the Create an instance button on the top right.
In the popup window, leave the Status as it is selected by default and then just select the memory allocation that you want to use for this instance.
After you create the instance, you will see it listed in the Memcached table:

Now that you have your Memcached database setup, you can configure a script that will help you use Memcached effectively.
Here is an example of how you can use Memcached for your dynamic sites:
Let’s say that you want to enable object caching for your blog, so that after a visitor loads a given blog post from the database, the next time they request it – that post will be served directly from Memcached.
In this example, we’ll configure an object, i.e. a blog post, to be saved in the cache on the first visit and then retrieved back upon the second visit.
Here is an example of blog post caching using Memcached:
<?php
define('MYSQL_HOSTNAME', 'localhost');
define('MYSQL_USERNAME', 'username');
define('MYSQL_DB', 'database');
define('MYSQL_PASSWORD', 'password');
define('MEMCACHED_SOCKET', 'unix:///home/sys/memcached.sock');
define('MEMCACHED_POSTS_KEY', 'posts');
define('MEMCACHED_POSTS_TTL', 10); //for how many seconds the posts are cached in memory</pre>

$db = $memcached = NULL;

if (!($posts = memcached_get_posts())) {
        if (!($posts = db_get_posts()))
                exit("Can't get posts");

        memcached_save_posts($posts);
}

foreach ($posts as $post) {
        echo "<p><a href='{$post['link']}'>{$post['title']}</a></p>";
}

function memcached_get_posts() {
        $mem = memcached_connect();
        return $mem->get(MEMCACHED_POSTS_KEY);
}

function memcached_save_posts($posts) {
        $mem = memcached_connect();
        $mem->set(MEMCACHED_POSTS_KEY, $posts, MEMCACHE_COMPRESSED, MEMCACHED_POSTS_TTL);
}

function memcached_connect() {
        global $memcached;

        if ($memcached)
                return $memcached;

        $memcached = new Memcache();

        $memcached->connect(MEMCACHED_SOCKET, 0) or exit("Could not connect to memcached");
        return $memcached;
}

function db_get_posts() {
        $db = db_connect();

        $query = 'SELECT * FROM posts ORDER BY id DESC';
        if (!($res = mysql_query($query, $db)))
                exit("Query failed.");

        $res = array();
        while ($row = mysql_fetch_assoc($res))
                $res[] = $row;

        return $res;
}

function db_connect() {
        global $db;

        if ($db)
             return $db;

        $db = mysql_connect(MYSQL_HOSTNAME, MYSQL_USERNAME, MYSQL_PASSWORD) or exit("Can't connect to DB.");
        mysql_select_db(MYSQL_DB, $db) or exit("DB error.");

        return $db;
}
?>
In this example:
– localhost is the name of your MySQL host; – in username and database you should put the name of the database where the blog posts are stored; – unix:///home/sys/memcached.sock is the Memcached socket that you will need to connect to; – posts is the Memcached key that the script will use to label the cached data and retrieve a blog post from the memory; you can name your keys the way you like (up to 250 chars are allowed); – 10 is the TTL value, which defines the period (in seconds) in which the data (the blog post) will be stored in the cache; Note: Please note that this is just an exemplary code and it might not work right for your particular case.***
Memcached is included by default with the Corporate and the Enterprise hosting packages, as well as with all OpenVZ VPS and Virtuozzo VPS packages, semi-dedicated servers and dedicated servers.
All other packages offer it as an upgrade option. Also, your customers can always upgrade the current Memcached memory quota of their plan from the Service Upgrades section of the Control Panel.
Originally published Tuesday, June 24th, 2014 at 4:11 pm, updated July 8, 2024 and is filed under Hepsia Control Panel.Tags: web hosting control panel, Varnish, Memcached, web accelerators


Leave a Reply