
How to strengthen the security of your PHP code
 PHP is the most popular scripting language, with more than 80% of websites and applications using it in the backend today.
It is the backbone of such popular content management platforms such as WordPress, Joomla and Shopify.
However, due to its popularity PHP has become a huge target for hackers. For that reason, securing its configuration is of critical importance.
Below you can find some important tips that will help to make your PHP configuration less susceptible to such threats.
How to locate the PHP configuration file (php.ini)
To secure your PHP configuration, you will need to apply some changes to the php.ini file.
This is the main PHP configuration file. It contains a number of default settings, which can be customized to fit the needs of your application.
Locating the php.ini file depends on the web hosting service and the type of server that you are using.
If using a shared hosting service
Contact your hosting provider if you are not sure about the location of the php.ini file.
In case the provider requires that the PHP settings should be placed in the “.htaccess” file of the web root, then add one per line in the format “php_value Name value”.
Some of the settings may not be modified – due to security measures set by the hosting provider.
On our web hosting platform, you can find the php.ini configuration file in the “Server settings” section of the Web Hosting Control Panel.
If using a VPS/ dedicated server
If you use cPanel/WHM on your server, it is simple to edit the PHP configuration file.
Just go to the “Software” section of the WHM and click on the “MultiPHP INI Editor”. In there, simply click on “Editor Mode”.
If you use an alternative panel, it is required for you to access the php.ini file manually.
Typically, Linux systems put the file at the path “/etc/php.ini”.
To confirm the location of the file, log into the server via SSH (your hosting provider can give you instructions on that), enter the command “php –ini” and press Enter.
The php.ini file path will be contained in the “Loaded Configuration File” line.
You can use a text editor, which can run within the command line – such as “nano” for Linux.
In order to open and edit the php.ini file, simply type “nano /path/to/php.ini” and press Enter.
How to edit the php.ini configuration file
The php.ini configuration file consists of various settings, which follow the “settingname = settingvalue” format.
Make sure you do not update the lines starting with a semicolon since they are comments.
The values described below are just recommendations. Before applying, please, make sure your application requirements match this configuration so as to avoid compromising the quality of performance.
Below is a list of the php.ini settings that will enable you to strengthen the PHP security:
Outgoing Connections
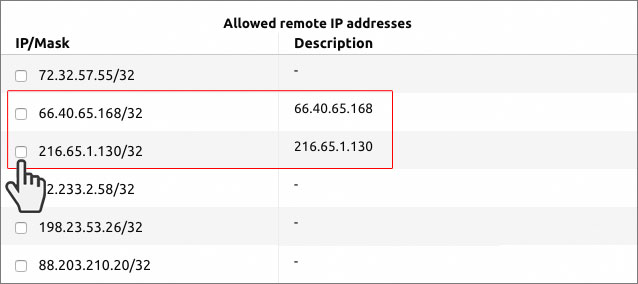
Remote content can’t always be trusted. On our web hosting platform, we have disabled outgoing connections by default.
Only connections to globally whitelisted IPs are allowed. This way your sites and applications will be protected from unsolicited connections to external hosts.
You can rest assured that no one can break into your code and send data to a particular host of their own for illegal purposes.
Of course, you will be able to authorize connections to a specific host or network mask via the Hepsia Control Panel integrated ‘Outgoing Connections’ section, or allow all outgoing connections.
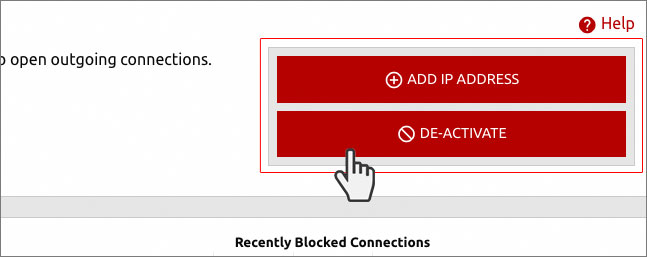
If you do the latter, you may still want to limit the ability of fopen wrappers to open remote URLs.
Using the Hepsia Control Panel, you can disable URL-aware fopen wrappers with a click from the php.ini file area of the PHP configuration section:
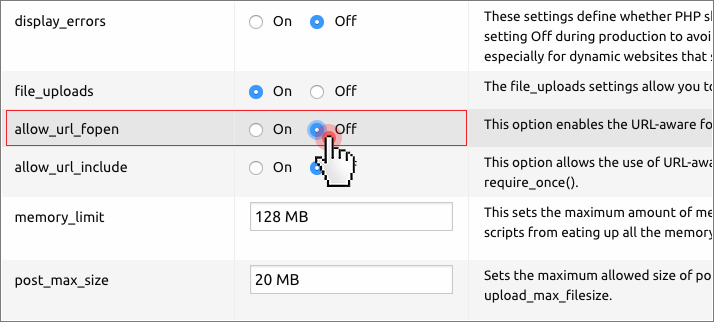
If you want to edit the php.ini directly, check the following lines:
allow_url_fopen = 0
allow_url_include = 0
And make sure they are both set to “0”. This will set fopen wrappers to only be able to load local content.
Runtime settings
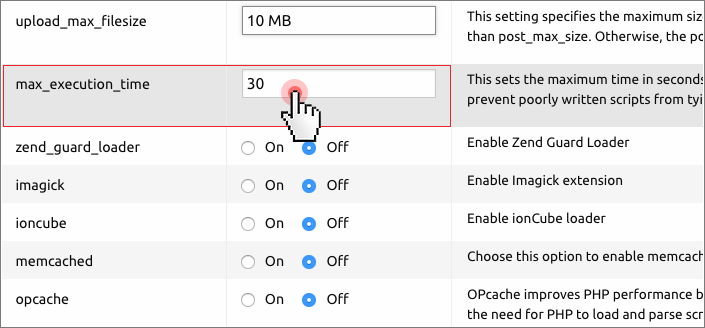
You should limit the maximum amount of time that a PHP script can run before it is terminated by the parser, as well as the amount of time allowed to process inputs. In the example below, this limit is set to 50 seconds.
As a result, a compromised script won’t run or read inputs for a large period of time.
max_input_time = 50
max_execution_time = 50
This is how the runtime settings can be managed on our platform:
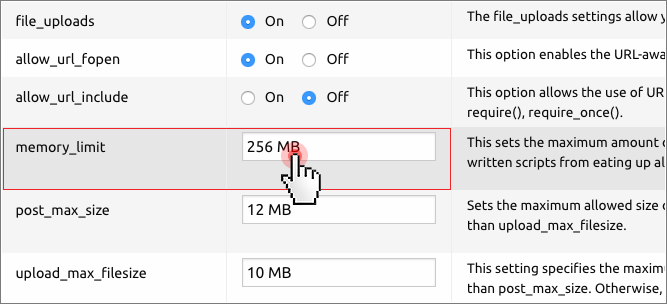
In the php.ini file, you can set the maximum amount of memory that a script is allowed to allocate.
memory_limit = 8 M
Never allow a PHP script to use more than 8 MB of memory.
This will help prevent poorly written scripts from eating up all the memory available on the server.
In the Hepsia Control Panel, you can set the maximum amount of memory with a click of the mouse:
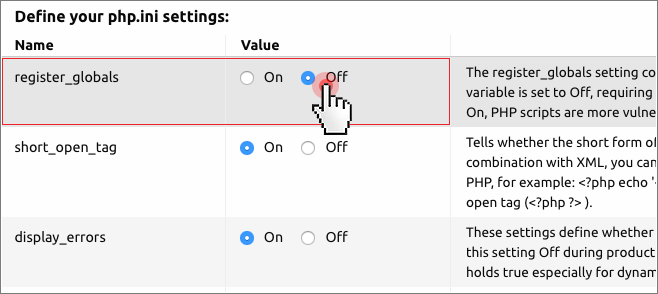
Disabling the “register_globals” setting will help you stop request data from being stored as a variable.
This is necessary since environment variables can easily be modified.
register_globals = off
Note: This setting is only applicable to older versions of PHP such as PHP 4, PHP 5 and PHP 5.3
By switching the expose_php setting off, you won’t provide unnecessary insight into the server.
expose_php = 0
Data inputs
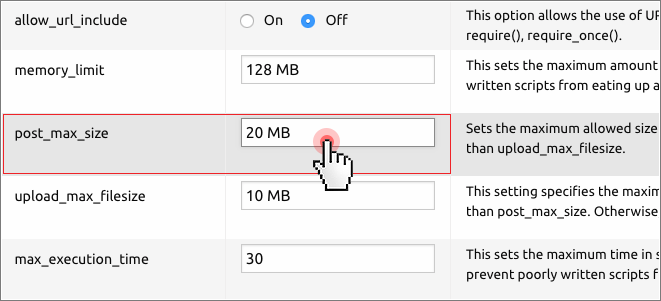
By limiting the size of post data and request data, you’ll be able to curb the effects of a potential hacker attack, which tries to flood web application resources.
post_max_size = 256 K
max_input_vars = 100
Provided your application has file upload capabilities, make sure that “post_max_size” has a set value at least as big as “upload_max_filesize“:
Error Logging
Error messages should be logged to a secure file on the server.
They are not to be displayed to the end user since the information they contain can potentially point hackers to the vulnerabilities of your code.
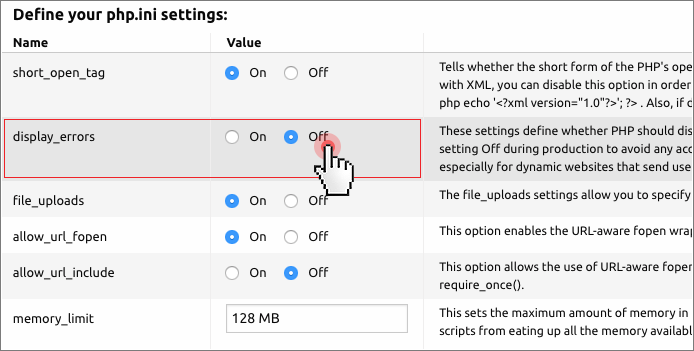
display_errors = 0
From the Hepsia Control Panel, you can easily turn this setting Off during production so as to avoid any accidental display of sensitive information about your website.

This is especially useful for dynamic websites that send usernames and passwords to access a database.
By logging PHP errors, you can both efficiently find vulnerabilities and debug the application code.
To ensure a secure location for the error log, make sure it is stored outside the web root.
log_errors = 1
error_log = /home/johndoe/error_log
Access to files
With the “open_basedir” setting you ensure that PHP can include files that are only from whitelisted directories.
open_basedir = "/home/johndoe/public_html"
This way, PHP scripts won’t be able to access secure files outside of the specified paths.
You should add to the whitelist every directory, which PHP will need to access.
This includes temporary file upload and session directories.
Make sure to put colons between the directories as shown below:
open_basedir = "/home/johndoe/public_html:/var/lib/php/tmp_upload:/var/lib/php/session"
On our platform, you can make use of the ‘Jail host’ option, which helps address a very specific security problem.
The ‘Jail Host’ option allows you to isolate a given host from the other domains within the www/ directory of a hosting account.
This way, if hackers try to attack the given host, they will be immediately ‘jailed’ in that host, i.e. they will not be able to use the host as a doorway to the rest of the system where the other hosts of yours are located.
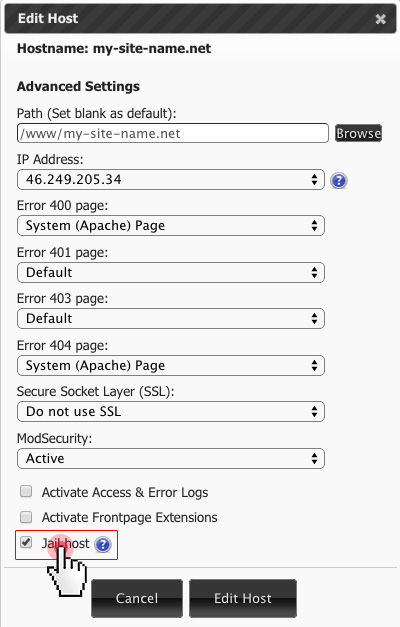
The “jail host” restriction works at the Operating System level, which will guarantee its efficiency in all cases of hack attacks on the given host.
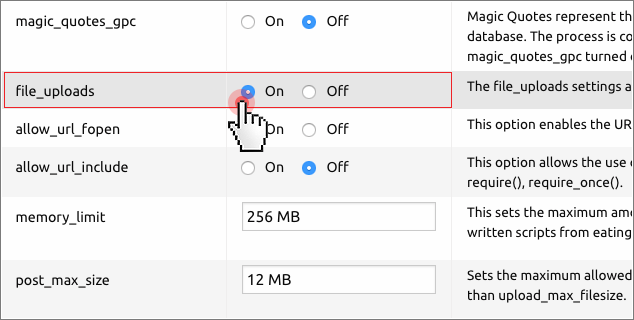
File uploads
If your application does not allow users to upload files from their computers, then you’d better disable this PHP feature so as to prevent hackers from infecting your application with harmful scripts.
file_uploads = 0
In case your app allows uploads then set smallest possible value for the “upload_max_filesize” setting, as shown below:
file_uploads = 1
upload_max_filesize = 1M
From the Hepsia Control Panel, you can easily edit the file_uploads settings so as to specify whether or not to allow HTTP file uploads:
Sessions
Sessions are used for authenticating access to web applications and for other similar purposes, so keeping them shielded is an essential part of PHP security.
You can greatly minimize the risk of session interception by updating the following php.ini settings:
session.use_strict_mode = 1
Remove the risk of session fixation by creating a new session ID in case the browser has sent a previously-uninitialized ID.
session.cookie_httponly = 1
XSS attacks can be prevented by simply making the session cookie accessible only via an HTTP request.
session.use_cookies = 1
session.use_only_cookies = 1
session.use_trans_sid = 0
Don’t send the session ID as a URL parameter. Instead, save it in a cookie.
This will help you prevent session fixation attacks.
session.name = custom_session_id
Update the key name of the cookie, which contains the session ID.
Use a custom value for “custom_session_id“.
session.cookie_secure = 1
If your app runs over the HTTPS protocol, this command will make your cookies with session IDs accessible only via a secure connection.
session.referer_check = example.com
By updating this value, you remove the possibility of session information to be accessed in case a script is loaded from an external source.
session.save_path = "/var/lib/php/session"
Since the default session file save path can be edited by all system users, it is advisable to move it to a more secure location.
You can either place it outside the web root or create the directory within the PHP directory itself (It could be “/var/lib/php” or “/var/lib/php5” depending on the OS).
Make sure you include the session save path in the open_basedir whitelist in case the open_basedir restrictions are enabled.
session.hash_function = sha512
In case you’re using PHP version 5.3+ use the hashing algorithm SHA-512.
It is more secure for creating session IDs than MD5. If you’re running an earlier version of PHP, use the SHA1 hash algorithm by inputting “session.hash_function = 1“
session.bug_compat_42 = 0
session.bug_compat_warn = 0
You can further increase security by disabling these settings. This would guarantee that session variables can’t be globally initialized.
Vulnerable functions
Some PHP functions could be used as doorways for web application hacks if not used reasonably.
Disabling the following functions at a go is a quick and effective solution to any potential problems:
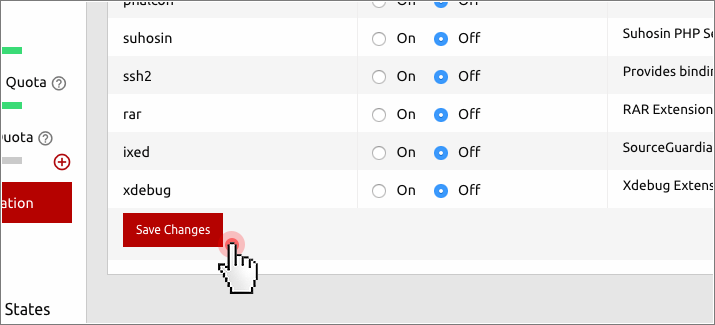
disable_functions = ini_set, php_uname, getmyuid, getmypid, passthru, leak, listen, diskfreespace, tmpfile, link, ignore_user_abord, shell_exec, dl, set_time_limit, exec, system, highlight_file, source, show_source, fpaththru, virtual, posix_ctermid, posix_getcwd, posix_getegid, posix_geteuid, posix_getgid, posix_getgrgid, posix_getgrnam, posix_getgroups, posix_getlogin, posix_getpgid, posix_getpgrp, posix_getpid, posix, _getppid, posix_getpwnam, posix_getpwuid, posix_getrlimit, posix_getsid, posix_getuid, posix_isatty, posix_kill, posix_mkfifo, posix_setegid, posix_seteuid, posix_setgid, posix_setpgid, posix_setsid, posix_setuid, posix_times, posix_ttyname, posix_uname, proc_open, proc_close, proc_get_status, proc_nice, proc_terminate, phpinfo, popen, curl_exec, curl_multi_exec, parse_ini_file, allow_url_fopen, allow_url_include, pcntl_exec, chgrp, chmod, chown, lchgrp, lchown, putenv
Feel free to make an exception for any of these functions – provided your app needs it.
To do that, just remove the given function from the list above.
How to make the php.ini file changes effective?
After making the desired changes to the php.ini file, you will need to restart the web server.
WHM provides a button for that. In case you’re not using a Control Panel, you’ll need to enter this command for Apache – “sudo apachectl graceful” and press Enter.
On our web hosting platform, you are free to update the php.ini file with a click on the Save settings file in the Control Panel.
All changes will be reflected on the web server without you needing to restart anything at your end.
A web application firewall
Editing the php.ini settings helps you disarm intruders within your environment in a variety of scenarios.
To ensure an immune environment to all manner of incoming attacks, you should also think of more global solutions.
Over 70% of all the attacks are now carried out at the web application level, which calls for the use of a web application firewall (WAF) to address the problem. A great solution we’ve adopted on our platform is the ModSecurity Apache.
It acts as an application-layer firewall and is able to effectively prevent most hack (brute force/ URL forgery) attacks and forum spamming attempts targeted at sites.
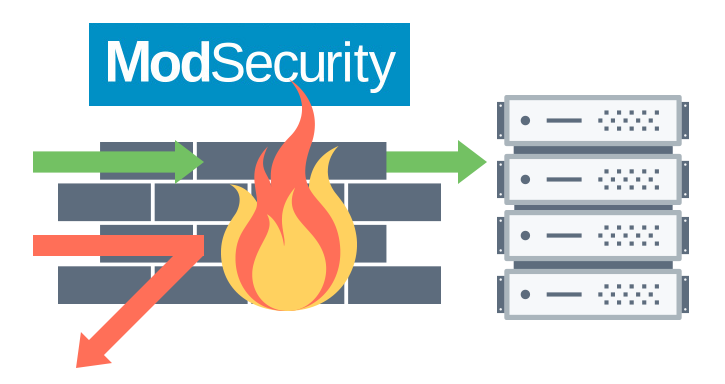
It establishes an external security layer, which allows for HTTP traffic monitoring and real-time analysis, and it offers a powerful API for implementing the advanced protection needed.
This way, the firewall ensures an enhanced level of security, where the malicious attacks are detected and prevented before they reach the web applications.
Thanks to the ModSecurity firewall, if there are more than 15 failed login attempts from an IP address within 3 minutes, the IP address will be blocked from accessing the website for the next 30 minutes. So far, the ModSecurity plugin has reduced the number of hacked websites on our servers dramatically.
***
Fine-tuning the PHP configuration file is a great step forward in securing your web environment against hackers.
Be informed, however, that the hardened PHP configuration goes hand-in-hand with a clean application code, so make sure to take care of both when figuring out your security strategies.
Originally published Monday, August 6th, 2018 at 2:30 pm, updated August 6, 2018 and is filed under Online Security.
Tags: web hosting control panel, PHP, modsecurity