
WordPress SEO basics: how to optimize your website from the ground up
If you are using WordPress as a technical foundation for your website, then you are lucky to be leveraging a great, SEO-friendly CMS platform that is generally helpful with optimization.
While WordPress generates SEO optimized code at the backend, however, there is some extra work that needs to be done to fully align your site with the best SEO practices.
Check out our quick and simple list of basic WordPress SEO guidelines that will help you optimize the search engine visibility of your website.
What is WordPress SEO about?
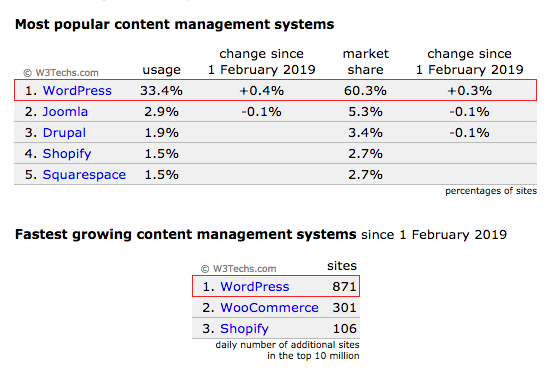
Being the most popular CMS platform on the web, WordPress currently powers more than 30% of all active websites online.
As WordPress evolves actively over the years (a few minor updates are released each month), it gets more intuitive for beginners and more SEO friendly.
This allows users with basic knowledge in Word or Google Docs to not only master the art of site configuration and content management but to also get a head start with search engine optimization from the get go.
That makes WordPress take a step up from a regular CMS tool and helps site owners take an active part themselves in improving Google rankings and drawing more organic traffic.
A WordPress installation alone comes with a basic technical SEO optimization at the backend as well as support for a plethora of free SEO plugins.
So, it’s up to the user how they will leverage the options available to create a well-optimized website.
Following is a list of the WordPress SEO basics that will help users fine-tune the on-page and technical SEO settings of their websites with ease.
General settings
- Site visibility
Make sure your website is technically visible to search engines. You can do this by verifying that the option to hide your site from search engines is not ticked.
You can find this option under Settings » Reading in the admin area of your WordPress site.
Just scroll down to the ‘Search Engine Visibility’ section and make sure that the ‘Discourage search engines from indexing this site’ box is unchecked:
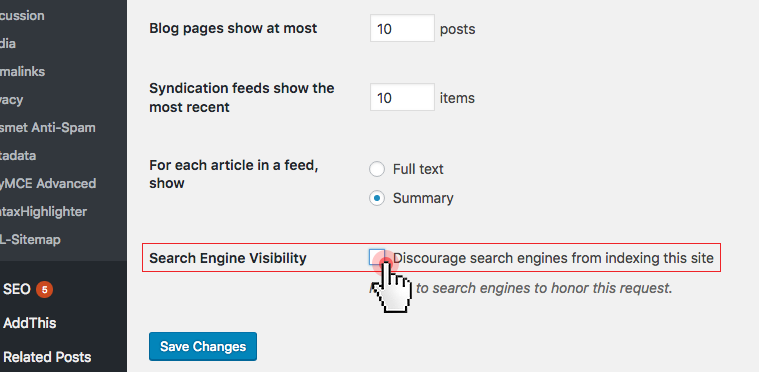
Click on the ‘Save Changes’ button to save your changes.
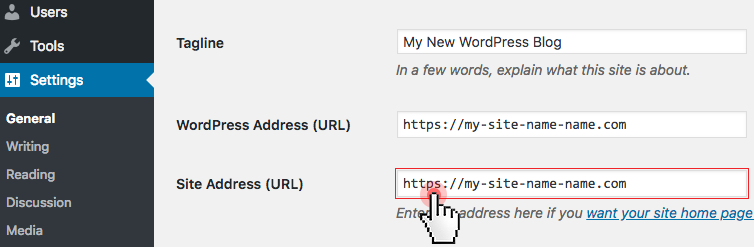
- Select between WWW or non WWW
In the eye of the search engine, the www and the non-www version of your website are two different entities.
For that reason, you have to define the preferred URL version for your site.
You can do that from the Settings » General section of the WordPress admin area.
Just fill in the preferred URL version in the ‘Site Address’ field:
For new websites, it does not make any difference which version you choose.
If your website has been running for a while in both the www and non‐www versions, then you should consider choosing the one that is prioritized by the search engines.
- SEO-friendly URL structure (permalinks)
The way your website URL is structured (permalinks) could impact your search positions.
The term permalink refers to the permanent URL for a webpage on your site that your want visitors to see.
Practice has shown that a custom URL like: https://www.my-site-name.com/how-to-choose-the-best-hosting-provider.html
will be both search engine and human-readable and will hence perform much better in search results than a generic URL like:
https://www.my-site-name.com/?p=10467
On WordPress, you can define the structure of your site URLs. You can do this from the Settings » Permalinkspage in your WordPress admin area.
Under ‘Common Settings’ – select the ‘Post Name’ option and then click on the ‘Save Changes’ button:
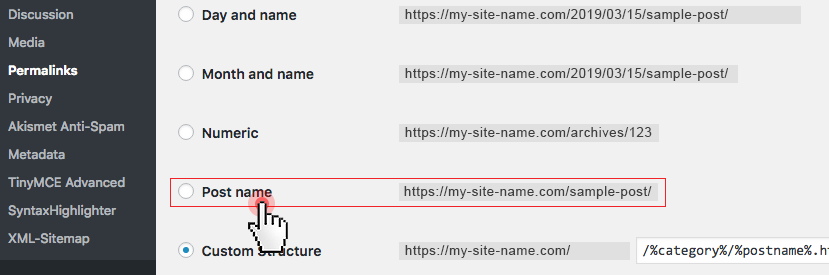
This option gives users an instant idea of what the page is about, which could help increase your click‐through rate in the search results and draw more visitors to your site.
NOTE: Be careful with the permalink change! If your website has been running for a while, then changing the permalink will require the setup of proper redirects. Otherwise, you will have broken backlinks to your site. You may need to hire a developer to do this for you!
- Organize your site pages in levels
Using the power of WordPress, you can organize your web pages in a manner, which is both machine and human-readable.
For instance, if you offer different types of web hosting in your store, you can organize them in folders as separate portal pages as follows:
my-site-name.com/web hosting/
my-site-name.com/vps/
Then, you can create a dedicated page for each of the hosting and VPS packages and place them in subfolders as follows:
my-site-name.com/web hosting/starter-plan/
my-site-name.com/web hosting/medium-plan/
my-site-name.com/web hosting/deluxe-plan/
my-site-name.com/vps/power-vps/
my-site-name.com/vps/super-vps/
my-site-name.com/vps/master-vps/
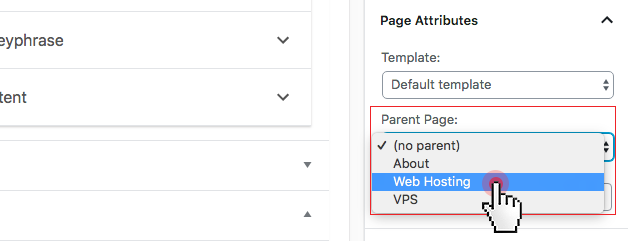
Each of the pages will be linked to from the main web hosting and VPS pages accordingly.
You can do all this from the page editor of WordPress. When creating the separate package pages, just select the corresponding ‘web hosting’ and “vps” page from the parent drop-down:
- Install an all-in-one WordPress SEO plugin
As mentioned earlier in this post, WordPress works with a variety of plugins that can help you manage your sites with ease.
As regards SEO, there are a few popular and absolutely free plugins that can help you deal with all the basic SEO tasks with a few clicks of the mouse, as follows:.
Here are some of the tasks that each of the plugins can help you with:
- Content optimization (readability, keyword density, outbound links analysis);
- Adding a meta title, description and focus keyword to each blog post/page;
- Generating an XML sitemap for your site;
- Adding meta robot tags;
- Generating breadcrumbs;
- Setting up a canonical URL;
Blog post optimization
Optimizing your blog posts and pages can be really easy using the WordPress SEO plugin you’ve installed as well as some of the in-built functionalities.
Here are some key adjustments you can make to optimize your posts/pages:
- Add custom meta titles, a description and a focus keyword
Meta titles and descriptions are a short presentation of your site for the search results. Make sure you set a unique and content-relevant meta title and description for each page or blog post.
The more enticing and concise (up to 60 characters for titles and up to 155 characters for descriptions) they are, the greater the chance that users will click on them and this will bring you more traffic from search engines.
Depending on the plugin you’ve installed, you will have an option to add a custom title, description, and focus keyword to every blog post and page.
If you use Yoast, for example, you can do that from the Yoast SEO section right beneath the post/editor:
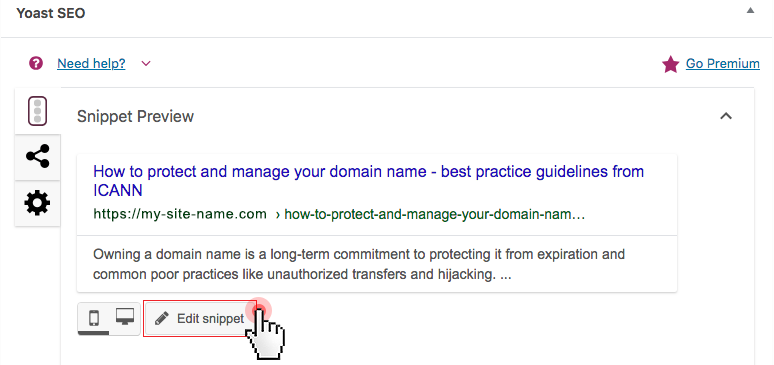
It also shows you a preview of what users will see in the search results for your website.
- Add a custom descriptive alt tag for images
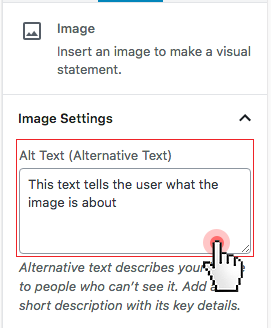
The descriptive alt tag helps search engines understand what your image is about and rank it well on their image index for the respective keywords (e.g. Google Images).
The alt tag is a short description of your image and represents alternative text if that image cannot be displayed.
You can add a custom alt tag when you upload an image. Make sure to keep it simple and accurate:
NOTE: Search engines can read image file names as well so make sure you use descriptive file names for your images too.
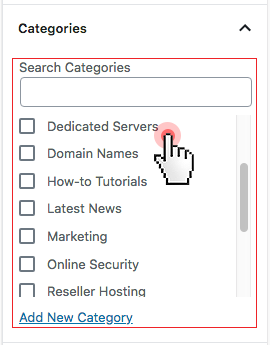
- Make use of categories and tags
With WordPress, you can sort your blog posts by topics using categoriesand tags.
Categories allow you to organize your content on a site-wide basis. They could be featured in the URL structure of your website or not depending on the Permalink type you have chosen.
For instance, if you run a web hosting store, you can create categories like web hosting that could match your URL structure (e.g. my-site-name.com/web-hosting/plan.html, etc.), domain names (e.g. my-site-name.com/domain-names/tld.html, etc.), VPS (e.g. my-site-name.com/vps/server.html, etc.), dedicated servers (e.g. my-site-name.com/dedicated-servers/server.html, etc.) etc.:
Tags in turn are specific keywords that label the contents of a blog post.
For example, a blog post filed under a “web hosting” category can have tags like server, website, site speed, etc.
All that makes it easy for users to browse your website and helps search engines understand the content structure of your website.
- Set custom URLs for posts & pages
WordPress allows you to customize your URLs to make them very visible and more clickable in search results.
You can do this by using the “Edit” button next to the current permalink of any blog post or page:
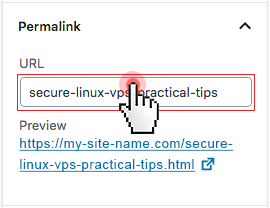
You could cut down your URLs to just a few words. Your best bet would be to use the primary target keyword for the specific post/page.
- Make your posts/pages more readable
Organizing your content into small paragraphs makes your posts easier to scan for users and hence more search-friendly.
The new “Gutenberg” view of the WordPress WYSIWYG editor is centered around the concept of blocks, which makes formatting content into small bits really easy:
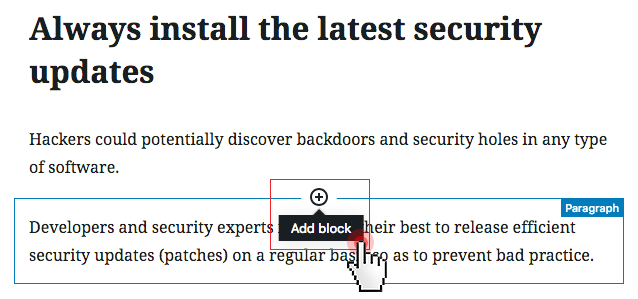
It’s very easy to use – when writing a post, just click on the “+” icon to add a block and select the type of content you want to create (write a paragraph, upload an image, etc.).
If you want to use an existing text, just paste it into the editor (make sure you avoid any formatting issues from Word, etc.) and then use the box options to edit it if necessary.
- Include internal links to other posts/pages
Internal linking is important for SEO since it increases pageviews and the time users spend on your site.
It also allows for brand new pages to get some link juice from pages with a higher authority.
You can add links to other posts and pages on your WordPress site really easily using the Gutenberg editor.
Just highlight the text that you want to use as anchor text for the link, then hit the “Insert/edit link” button and paste in the URL of another page or post that you want to link to:
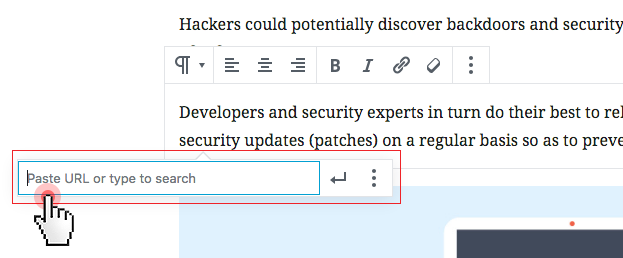
The more content-relevant links you include, the higher the chances you will improve the SEO score of your new posts and pages.
- Optimize blog post comments
Comments are a great way for users to engage with you and link back to your website.
However, they could hurt your search rankings as well if stuffed with low-quality content and spammy or bad links.
A great way to protect your website from comment spam is to use the Akismet plugin, which comes pre-installed with your WordPress setup.
However, it is not 100% effective in filtering out spammy content. For that reason, the best way you can control comments on your site is to enable manual revision and approval of comments.
You can do that by ticking the “Comment must be manually approved” option in Settings > Discussion.

***
You’ve learnt some of the best practices for optimizing the SEO score of your WordPress website from the ground up.
These include general website adjustments and blog post-specific optimization techniques that could help you make your site more SEO-friendly.
In the next blog post, we’ll focus on some key website speed and security optimization tips for your WordPress site that could take your efforts to make your site SEO-friendly a bit further.
Originally published Friday, March 15th, 2019 at 11:42 am, updated March 22, 2019 and is filed under SEO.